Setting up your centre
If you are a new registered centre or you’re setting up for a UCAS application cycle for the first time – first off, welcome to the team! You now have unique access to applications, and by using the adviser portal you’ll be able to manage, send, and track the progress of your students’ applications all in one place.
What's on this page?
- Before you start
- Setting up your centre for the new application cycle
- Confirm your centre and reference details
- Select application fee payment option
- Reference template
- Create your centre’s buzzword
- Create your qualifications shortlist
- Set up your groups
- Add referee contact details
- Add your staff and set access permissions
- Account status
- Further information
Before you start
Every UCAS registered centre has a registered centre correspondent. When we set up your centre, we set up full permissions for your centre's registered centre correspondent. They are responsible for:
- setting up centre details, including creating a buzzword and setting application fee payment options
- adding new staff, setting their permissions, and assigning them to groups
- creating and managing groups
- creating or reviewing the shortlist of qualifications
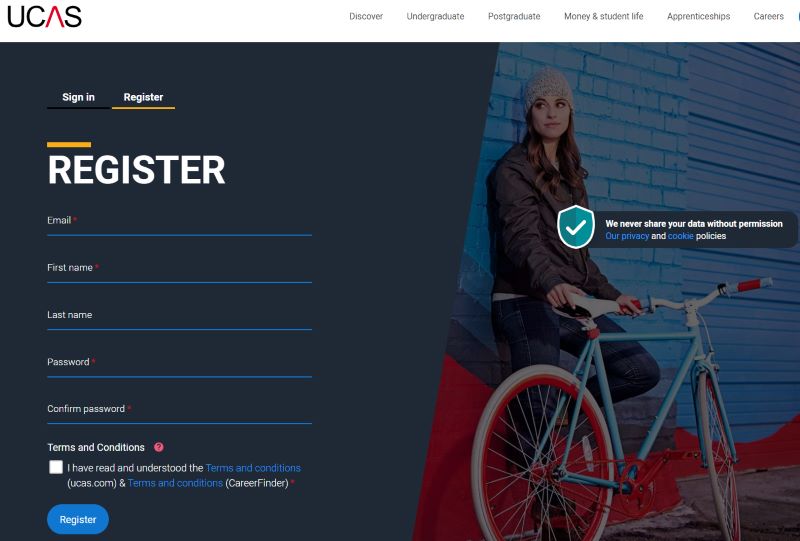
Before you can access and start using the adviser portal, you and any staff you want to use it need to register an account on ucas.com and verify it – you only have to do this once. Anyone already registered for the adviser portal can sign in using the email and password they currently use.
It’s important you register with the email address we have for you. If you update or change your email address at any time, let us know as soon as possible.
Register and sign in to the adviser portal
If you’ve not used the adviser portal before you’ll need to register an account – follow the on-screen instructions.
Key points when registering
- Use the email address and password you’ll use to sign in to the adviser portal.
- Your ‘First name’ field will be displayed on your dashboard in the adviser portal, e.g. ‘Sarah’s dashboard’.
- Register with the email address your UCAS registered centre correspondent has set you up with, as this has been used to set your permissions and access.
- UCAS cannot reset passwords. Use the ‘Forgotten password’ link on the sign in page.
If you’ve already registered on ucas.com, a message will appear advising you the email address is already in use. You can then use the ‘Forgotten password’ link to reset it.
Verify your account
Once you've registered, you’ll be asked to enter a code to verify your account. You should have received an email from us containing your unique code.
If you can’t see it in your inbox, check your spam or junk folders. It’ll be sent from noreply@ucas.com – add this address to your safe senders list and ask your IT team to add it to their network access controls to make sure you get future updates.
You can request another code by clicking the on-screen link.
Your dashboard
Each time you sign in, the first page you’ll be taken to is your dashboard.
Access to the different management tools depends on your permissions. UCAS registered centre correspondents automatically have access to all of them.
There will be the option to view either your 2025 or 2026 cohorts in the adviser portal.
You’ll also see an ‘Adviser information and advice’ section at the bottom of your dashboard. The links take you to helpful advice on ucas.com.
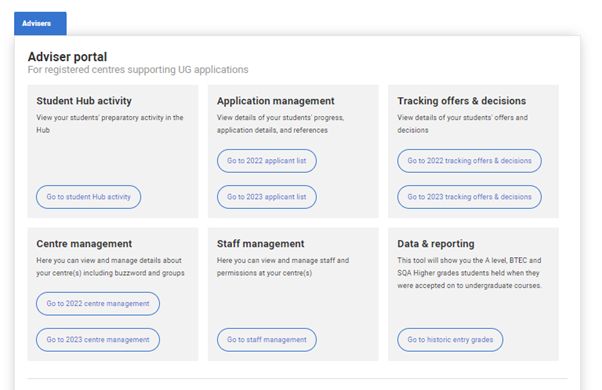
Summary of the adviser tools
Student Hub activity
Application management
Tracking offers and decisions
Centre management
Staff management
Data and reporting
If you're an adviser at more than one registered centre, you’ll be presented with a centre list to choose from in each management area.
For more information see our online training.
Setting up your centre for the new application cycle
The first time you sign in you need to set up the adviser portal. To do this, complete the following steps in order:
1. Go to 'Centre management'
You need to work your way through the compulsory set up wizard, which will ask you to:
- confirm centre and reference details
- select application fee payment option
- create your centre’s buzzword
- accept the terms of service
2. Go to ‘Staff management’
From here you need to set up your staff and set access permissions. Please see ‘Add your staff and set access permissions’ section below. Each member of staff you add will receive an automated email asking them to register for a UCAS account to enable them to sign in and access the adviser portal.
You can monitor if staff members have registered in ‘Staff management'.
3. Click back into ‘Centre management’
You can now:
- set up your groups
- create your qualifications shortlist
- add referee contact details
Your UCAS centre number is shown in the top left of every page. This is a unique number, used to identify your centre. You need this if you contact UCAS.
Important: If you set up groups, please ensure you add staff members to those groups to enable them to see those applicants. Please see section below ‘Set up your groups’.
What is rollover?
If you’re an existing UCAS registered centre correspondent, all your staff, their permissions, groups, referees, and shortlisted qualifications will be rolled over from the previous application cycle each year.
Each application cycle, the first time you access centre management you'll see our set-up wizard. You’ll need to:
- check your centre details are up-to-date
- create a buzzword for the new cycle
- set up your application fee payment option
- agree to our adviser portal terms of service for your centre
With regular staff changes within registered centres each year, the individual setting up for the new cycle (e.g UCAS registered correspondent) will confirm they agree to the adviser portal terms of service. This forms part of the annual setting up process for a registered centre to be able to manage applications.
All rolled over details can be edited once your centre has been set up for the new application cycle.
You’ll need to add any additional or new staff as users to the adviser portal and set the relevant permissions in the Staff management area.
Check and amend your group names where necessary before you give the buzzword to your students – they can choose a group when they start their application.
It is the registered centre correspondent’s responsibility to complete the set-up wizard before students can begin linking to your school/college or centre
If you would like us to walk you through the set-up wizard, take our online module to setting up.
Confirm your centre and reference details
The details in this section will be used by universities and colleges as the default information to contact your centre’s referees.
You can edit and update the information yourself, apart from your centre name, UCAS centre number, or centre type. If these details are incorrect, please contact our Schools Team between 08:00 – 18:00 (UK time), Monday to Friday:
To update individual referee contact details or add additional referees, use the ‘Referee contact details’ section in the centre management section.
You can also identify any dates your students will be unavailable. This is to discourage universities and colleges from inviting applicants to interviews, or contacting referees, during holiday periods, for example.
Select application fee payment option
For 2026 entry, the application fee is £28.95 for up to five choices.
Within ‘Centre management’ you must select how you would like students at your centre to pay for their applications from the options below.
You can update your ‘application fee payment methods' in ‘Centre management’ at any point during the cycle.
UCAS to send your centre an invoice
- Your centre pays the application fee for each applicant applying through your centre. You can ask for reimbursement from the applicants if you wish (your students shouldn’t send payments directly to UCAS).
- UCAS will generate monthly invoices to your school/college centre listing the applicants who have submitted to UCAS. Please ensure UCAS has an up-to-date finance contact, the UCAS registered centre correspondent will also be included in correspondence.
All your applicants to pay online by credit card or debit card
Applicants will pay for their application using their own payment card when they review and submit.
Some applicants to pay online by card and UCAS to provide an invoice for the remaining applicants (the invoice is to be paid by your centre)
- Applicants are given the option to choose whether they pay the application fee themselves. The application fee will be invoiced to your centre for those who do not pay when reviewing and submitting their applications..
- Please ensure UCAS has an up-to-date central finance contact (e.g. accounts payable email); the UCAS registered centre correspondent will be included in correspondence.
Free school meals (FSM) fee waiver – UK domiciled applicants only
- UCAS has removed the application fee for UK students in receipt of free school meals, making it easier for young people experiencing acute financial hardship to access higher education.
- You must enable this application fee payment option for students to benefit from this initiative. It will only be presented to students who have identified ‘yes’ to the FSM question in the ‘More about you’ section of the application.
- It will be presented to students along with one of the other application fee payment options chosen.
- If you do not enable this option, applicants will not be given the fee waiver option when they ‘Review and submit’.
- Please ensure you read our full guidance on how to manage this process in your school, college or centre.
Reference template
This can be used to create a standard statement with contextual data about the school, and added to each student's reference via a tick box.
Create your centre’s buzzword
A buzzword is a unique term you can give to students applying through your centre.
Students are asked for this buzzword in their application. It automatically links them to your centre – giving you permission to attach your reference, and view and manage their application.
Buzzword key points
- You need to set up a buzzword at the start of each new cycle.
- To avoid confusion between application cycles, we recommend using a different buzzword from those used in previous cycles.
- Try to make the buzzword unique to your centre. Avoid words that might be used by other centres – for example, University2026, Applying2026 or UCAS2026.
- You can pick a new buzzword at any time in the cycle within ‘Centre management’, but remember to let your staff and students know if you change it.
- Students who enter the buzzword at the start of the application are automatically listed in the adviser portal.
- Students who start an application and enter the buzzword in the status bar of their application will need to be accepted by the school or college via the ‘waiting to link to centre’ filter.
- After the application has been submitted to UCAS, students need to contact us to be linked to a centre.
Create your qualifications shortlist
This shortlist is shown to your students when they complete the education section of the application. Creating a shortlist helps them enter the correct qualifications – particularly important if there are similar qualifications to choose from.
Qualifications can be added and removed from the shortlist at any time during the cycle.
You can search to find the relevant qualifications for your centre. Qualifications are listed by qualification name and not by subject; you cannot search using abbreviated qualifications titles, e.g. A level. You can select as many qualifications as required.
Set up your groups
Groups can be a useful way to sort your students and help you manage your cohort. For example, applicants can be sorted into tutor or referee groups, or even a group for your ex-students.
You must add staff and set their permissions in ‘Staff management’ before creating any groups.
When creating new groups for your centre, you’ll need to choose a group name and assign staff members to access them. You can add as many members of staff as necessary.
All staff will be given permission to access the default group, but can be removed from it, if needed. Permissions to view, manage, and submit applications and references are controlled in ‘Staff management’.
Students will be asked to choose a group in their application when they link to your centre. If you don’t set up any groups prior to this, applicants will automatically appear in the ‘Default Group’.
Key points to note on groups
- Group names can be edited, and staff and students allocated to groups can be changed at any time. Head to ‘Groups’ in 'Centre management' to add/remove staff or students to multiple groups.
- Add staff to ‘Staff management’ and you’ll be able to assign them groups before they register.
- All staff are given permission to your default group – if needed they can be removed. Permissions to view, manage, and submit applications and references are controlled in ‘Staff management’.
- Staff permissions are the same for all groups they’re assigned to, allowing them to view students in both ‘Application management’, and ‘Tracking offers and decisions’.
- If you set up new groups during a cycle make sure you remember to add staff to them as they're not automatically given access.
- Using a staff member's name as the title of a group doesn't automatically give them access to the group.
- If you have former students linking for full application management, you could set up a 'Former students' group to place them in, to help filtering later on.
- Groups and associated staff members, including their permissions, will be copied over from the previous cycle – without the associated students.
- You’re able to add, edit, and manage your groups in ‘Centre management’ once your centre is registered for the new cycle each year.
Add referee contact details
You need to enter the details for all referees required. The information you provide in ‘referee contact details’ is seen by universities and colleges as part of the reference, and they contact contact the referee, if needed.
If you require these referees to also access the portal, you need to ensure their details are also in ‘Staff management’ and they have relevant permissions.
When adding a new referee, contact details will be copied from the ‘Centre and reference details’ tab, but you can overwrite them, if needed.
You’re able to add, edit, and manage your referee contact details in ‘Centre management’ once your centre is registered for the new cycle each year.
Add your staff and set access permissions
Go to your staff list in ‘Staff management’ to add a new staff member by entering their email address. This email must be the same as the one they will use to register on ucas.com If they don’t match, they won’t be able to access the portal.
Once you have entered the staff member’s email address, you need to set their access permissions to define:
- the areas of the adviser portal they can access
- what actions they can carry out on an application
It’s important to remember a staff member’s permissions only apply to the group(s) they are assigned to. Use the ‘Groups’ tab in ‘Centre management’ to manage the groups they can access. All staff have automatic access to the ‘default group’.
Once you have added the staff member and saved their permissions, they will receive an automated email directly from UCAS confirming they have been added to the centre, with links to either register or sign in. We also give them links to step-by-step guides.
Staff permissions can be edited at any time during the cycle.
Your staff members, including their permissions, will be copied over from the previous cycle each year. You’ll be able to edit your staff and permissions once your centre has been registered for the new cycle.
It’s essential that permissions are reviewed regularly, and staff who have left are removed from the system, to ensure data security. By removing them from your staff list you’ll remove any actions or permissions they had. Please read our complete guidance on information and data security in our annual Adviser Guide.
Account status
The ‘Account status’ in staff management shows if they have completed their ucas.com account registration, and indicates if any action needs to be taken.
Staff members must be verified to access the adviser portal.
The account statuses are:
Unregistered
Unverified
Verified
Further information
For more information, see managing applications and tracking offers and decisions